Nginx利用反向代理做负载均衡
前言:
前几天博客突然访问量增大,导致VPS的CPU报警。我决定使用PR机房的另一台小机子做反向代理缓存+负载均衡。
一后端的朋友说我这个玩法好奇怪,他说现在的主流玩法是这样的:
部署2个后端,前端也是2个nginx,域名解析到2个nginx上,nginx又把请求轮询给后端,或者直接给本机的后端。
而我的做法是这样的:
部署一个后端,再部署一个反向代理后端,在主后端上解析两个nginx,进行轮询。
做法奇怪,但是可以以最小成本解决问题嘛。
图示: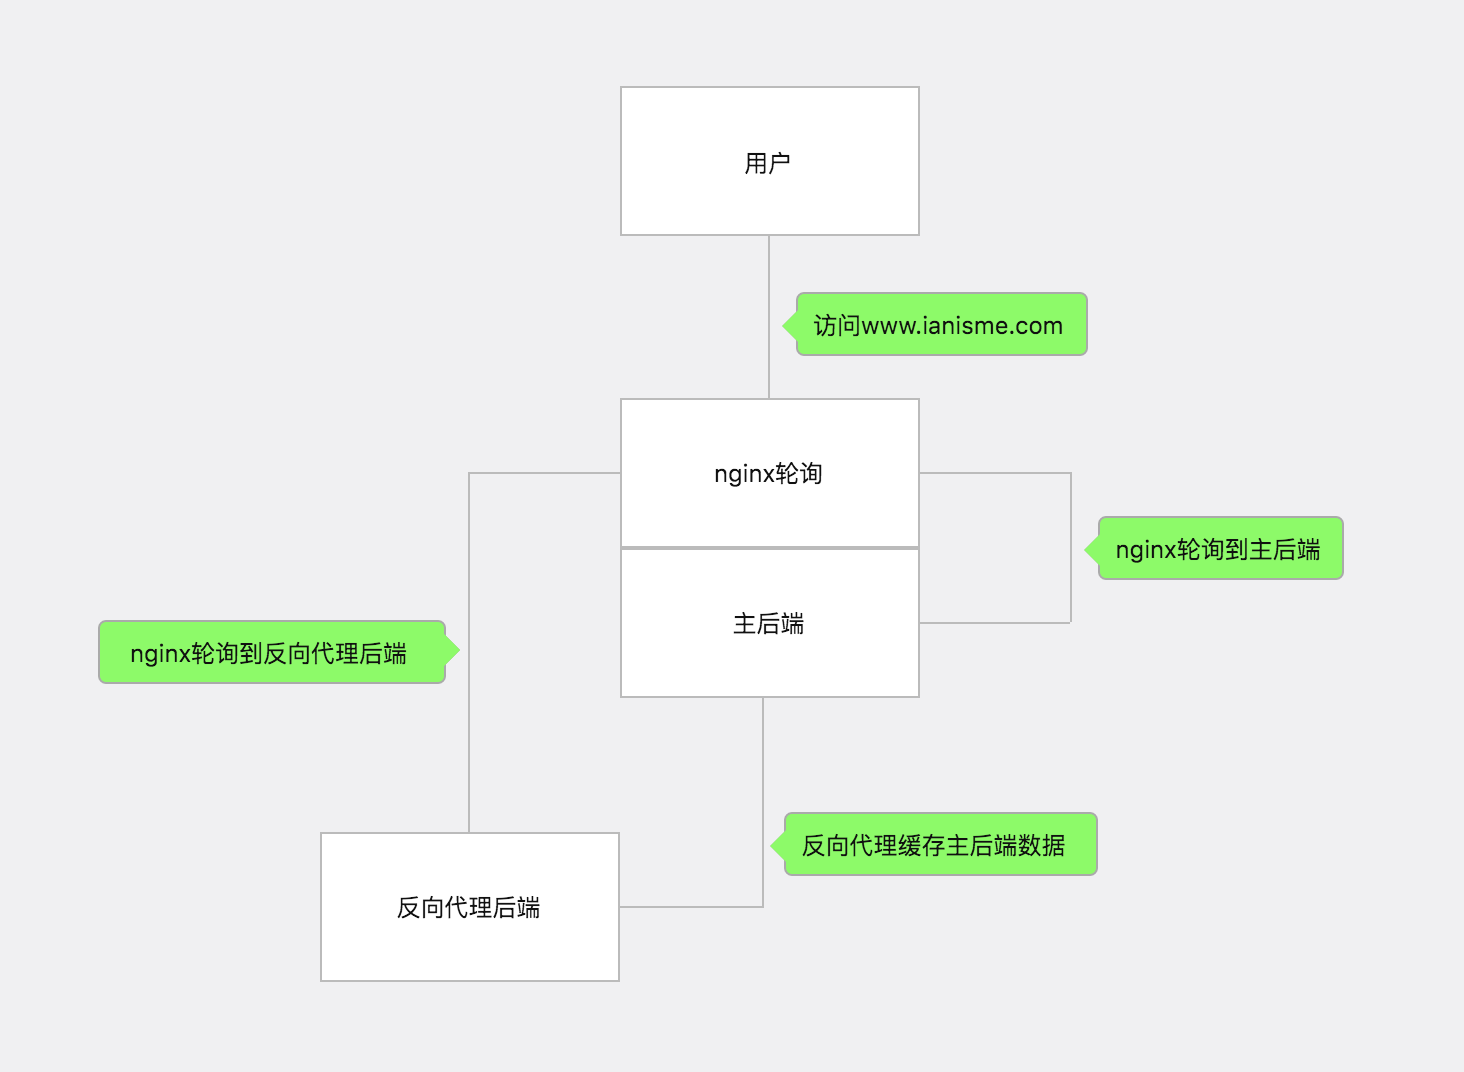
部署步骤:
第一步:部署反向代理后端
首先准备一台新的vps,这里我的这个vps只有不到100MB的内存,我安装了Debain 6 32位系统,只安装了nginx。
这里我在/etc/nginx/目录创建一个vhost.conf配置我的反向代理虚拟主机。(你们的安装路径不一定是这个)
server {
    listen 80;
    server_name 127.0.0.1;
    location / {
        #allow 127.0.0.1; #这里最好填写你要反向代理的服务器地址,配合deny all使用禁止其他的访问
        #deny all;
        proxy_cache cache_one;
        proxy_cache_valid 200 304 2h; #这里我设置200和304状态都为2个小时
        proxy_cache_valid 301 3d;     #301重定向我设置为3天
        proxy_cache_valid any 10s;     #其他状态码我设置为10s
        proxy_cache_key $host$uri$is_args$args;
        proxy_pass http://***.***.***.***:8080; #这里是我要反向代理的地址
        proxy_redirect off;
        proxy_set_header X-Real-IP $remote_addr;
        proxy_set_header X-Forwarded-For $proxy_add_x_forwarded_for;
        expires 10d;
    }
    # 后台目录不缓存
    location /wp-admin {
        if ( !-e $request_filename) {
            proxy_pass http://***.***.***.***:8080;
        }
    }}
然后我们我们创建两个缓存文件夹
mkdir /home/nginxcache/path -pmkdir /home/nginxcache/temp -p
chmod -R 777 /home/nginxcache #确保目录可写
然后我们在/etc/nginx/nginx.conf配置文件http{}中加入以下代码,并把vhost.conf引入进来
    client_body_buffer_size 512k;
    proxy_connect_timeout 5;
    proxy_read_timeout 60;
    proxy_send_timeout 5;
    proxy_buffer_size 16k;
    proxy_buffers 4 64k;
    proxy_busy_buffers_size 128k;
    proxy_temp_file_write_size 128k;
    proxy_temp_path /home/nginxcache/temp; #缓存路径
    proxy_cache_path /home/nginxcache/path levels=1:2 keys_zone=cache_one:60m inactive=7d max_size=2g; #60m是内存占用,7d是7天无访问删除,2g是缓存的硬盘空间
    include /etc/nginx/vhost.conf; #引入我刚才创建的虚拟主机配置文件
我们重启nginx即可
/etc/init.d/nginx restart
然后我们访问刚才创建的反代的ip,是不是访问成功了呢?我们再看看/home/nginxcache/文件夹下是不是有缓存文件了呢?
第二步:在主后端部署nginx负载均衡
下面我需要将主后端上的虚拟主机端口从80换为8080,为了避免负载均衡冲突。在对应的虚拟主机conf文件中修改
server{
    listen       8080;
    server_name 127.0.0.1;
    #以下省略若干代码
    #......}
下面在nginx.conf中加入nginx轮询代码了
upstream www.ianisme.com {
ip_hash;
server ...:80; #反向代理后端(我就不暴露ip了)
server 127.0.0.1:8080; #本机的主后端
#这里我没有设置参数 两个后端是同等级的weight
#另外还有IP Hash,fair,URL hash的配置模式}server{
listen 80;
server_name www.ianisme.com;
location / {
proxy_pass http://www.ianisme.com;
proxy_set_header Host $host;
proxy_set_header X-Real-IP $remote_addr;
proxy_set_header X-Forwarded-For $proxy_add_x_forwarded_for;
}}server {
listen 80;
server_name ianisme.com;
return 301 http://www.ianisme.com$request_uri;}</pre><h2 style="margin: 10px 0px; padding: 0px; border: 0px; vertical-align: baseline; font-variant-numeric: inherit; font-variant-east-asian: inherit; font-stretch: inherit; line-height: inherit; font-family: "lucida grande", "lucida sans unicode", lucida, helvetica, "Hiragino Sans GB", "Microsoft YaHei", "WenQuanYi Micro Hei", sans-serif, sans-serif; font-size: 18px; color: rgb(47, 47, 47); letter-spacing: 1px; white-space: normal;">第三步:解决重定向过多的问题(让wordpress支持绑定多个域名)</h2><p style="margin-top: 0px; margin-bottom: 20px; padding: 0px; border: 0px; vertical-align: baseline; font-variant-numeric: inherit; font-variant-east-asian: inherit; font-stretch: inherit; line-height: inherit; font-family: "lucida grande", "lucida sans unicode", lucida, helvetica, "Hiragino Sans GB", "Microsoft YaHei", "WenQuanYi Micro Hei", sans-serif, sans-serif; color: rgb(47, 47, 47); letter-spacing: 1px; white-space: normal;">因为wordpress默认情况下会自动跳转到后台规定的home_url上去,这样会导致重定向过多的问题。<br/>我们需要在wp-config.php中添加如下代码:</p><pre class=" language-objectivec" style="padding: 1em; border: 0px; vertical-align: baseline; font-variant-numeric: inherit; font-variant-east-asian: inherit; font-stretch: inherit; line-height: 1.5; font-family: Menlo, Monaco, Consolas, "Courier New", monospace; font-size: 12px; position: relative; border-radius: 5px; background-color: rgb(245, 242, 240); word-wrap: normal; transition: all 0.4s ease; text-shadow: white 0px 1px; direction: ltr; word-break: normal; tab-size: 4; hyphens: none; overflow: auto; letter-spacing: 1px;">define('WP_SITEURL', 'http://' . $_SERVER['HTTP_HOST']);define('WP_HOME', 'http://' . $_SERVER['HTTP_HOST']);</pre><p style="margin-top: 0px; margin-bottom: 20px; padding: 0px; border: 0px; vertical-align: baseline; font-variant-numeric: inherit; font-variant-east-asian: inherit; font-stretch: inherit; line-height: inherit; font-family: "lucida grande", "lucida sans unicode", lucida, helvetica, "Hiragino Sans GB", "Microsoft YaHei", "WenQuanYi Micro Hei", sans-serif, sans-serif; color: rgb(47, 47, 47); letter-spacing: 1px; white-space: normal;">当nginx轮询到反代服务器的时候,wordpress内部就会将需要用到地址的地方全部修改为反代的域名,解决这个问题。</p><h2 style="margin: 10px 0px; padding: 0px; border: 0px; vertical-align: baseline; font-variant-numeric: inherit; font-variant-east-asian: inherit; font-stretch: inherit; line-height: inherit; font-family: "lucida grande", "lucida sans unicode", lucida, helvetica, "Hiragino Sans GB", "Microsoft YaHei", "WenQuanYi Micro Hei", sans-serif, sans-serif; font-size: 18px; color: rgb(47, 47, 47); letter-spacing: 1px; white-space: normal;">第四步:解决评论ip是127.0.0.1的问题</h2><p style="margin-top: 0px; margin-bottom: 20px; padding: 0px; border: 0px; vertical-align: baseline; font-variant-numeric: inherit; font-variant-east-asian: inherit; font-stretch: inherit; line-height: inherit; font-family: "lucida grande", "lucida sans unicode", lucida, helvetica, "Hiragino Sans GB", "Microsoft YaHei", "WenQuanYi Micro Hei", sans-serif, sans-serif; color: rgb(47, 47, 47); letter-spacing: 1px; white-space: normal;">这里一定要设置一下,否则评论的ip都是无法记录的。这里感谢 <a href="https://kn007.net/topics/server-before-and-after-the-end-of-the-separation-wordpress-unable-to-record-visitors-ip-solution-method/" style="margin: 0px; padding: 0px; border-width: 0px 0px 1px; border-top-style: initial; border-right-style: initial; border-bottom-style: solid; border-left-style: initial; border-top-color: initial; border-right-color: initial; border-bottom-color: rgb(153, 102, 204); border-left-color: initial; border-image: initial; vertical-align: baseline; font-style: inherit; font-variant: inherit; font-weight: inherit; font-stretch: inherit; line-height: inherit; font-family: inherit; color: rgb(153, 102, 204); text-decoration-line: none; opacity: 1;">kn007的方法</a><br/>在wp-config.php中添加如下代码:</p><pre class=" language-objectivec" style="padding: 1em; border: 0px; vertical-align: baseline; font-variant-numeric: inherit; font-variant-east-asian: inherit; font-stretch: inherit; line-height: 1.5; font-family: Menlo, Monaco, Consolas, "Courier New", monospace; font-size: 12px; position: relative; border-radius: 5px; background-color: rgb(245, 242, 240); word-wrap: normal; transition: all 0.4s ease; text-shadow: white 0px 1px; direction: ltr; word-break: normal; tab-size: 4; hyphens: none; overflow: auto; letter-spacing: 1px;">if(isset($_SERVER['HTTP_X_FORWARDED_FOR'])){$list = explode(',',$_SERVER['HTTP_X_FORWARDED_FOR']);$_SERVER['REMOTE_ADDR'] = $list[0];}因为X-Forwarded-For头的记录格式是:client1,proxy1,proxy2,所以我们获取第一个client1。
重启nginx,我们再次访问www.ianisme.com的时候其实就是在轮询访问了,刷新一下访问的可能是主后端也可能是反向代理的后端。可以将反向代理的代理网址设置为www.baidu.com进行测试。
总结:
实现了简单的负载均衡,分担了部分服务器压力。最后感叹一句,nginx漂亮!
<br/>